Every website visit is a great opportunity to generate a sale. However, 96% of people who visit your store are not ready to make a purchase. They come to your website, take a look at the page, then leave.
Another big challenge marketers face is cart abandonment. Study shows more than 79% of online shoppers abandon their cart before making a purchase.

However, the worst part is most of those visitors won’t even remember you as soon as they look at something else.
This problem happens to the best in business. What’s cool about cart abandonment is the shoppers showed interest in your product. They just need a little push to finish their purchase.
The solution to this problem is Facebook retargeting.
If you use it correctly, people who see your retargeted ads are more likely to convert by 70%.
In this guide, I will show how to set up a successful retargeting campaign to banish cart abandonment.
What Is Facebook Retargeting?
If you run a business online, you know advertising plays a critical role to drive traffic to your website, generate leads, and get customers.
But what if a customer abandoned the purchase process for all kinds of reasons:
- They’re not sure if the product worths the investment.
- They receive an urgent email.
- They may be looking for something cheaper or better.
Your potential customers may have endless reasons to not complete that purchase. But you can overcome all this and bring your customers back to your sales funnel.
But how can you do that?
Retargeting is a powerful advertising technique to bring back visitors who leave your website before making desired action (like making a purchase, complete registration, or downloading lead magnet).
It allows you to display specific ads to a specific audience with the intent to convince them with your offer
This can be done through different advertising platforms such as Google Adword, Bing Ads, Twitter Advertising, and Facebook advertising.
In this guide, I will explain to create a remarketing campaign through Facebook advertising.
Retargeting works extremely well because it targets the visitors who show an interest in your offer.
With the support of SEO and social media platforms, you can remind that your product or service is the best solution to their problems.
How does Retargeting Works?
Have you ever come across one of the boxes whenever you visited a website.
When you click on Allow, Ok, or Accept, you re-permitting the advertiser to remarket to you.
From now on, whenever you browse another site, your retargeting ad platform will know when to show up your ad from your website.
Most advertising platforms practically work the same way.
To set up a retargeting campaign, you need first add a piece of code – a pixel- to your website. This code is not noticeable to your visitors and won’t affect your site performance, which then places a tracking code – a cookie- in the person’s computer visiting your website
This tracking code collects important information about your visitor’s behavior.
With that information, you can create a relevant ad to create a positive experience based on user behavior.
Why Retargeting Is Essential To Your Marketing
Cost-Effective
Nothing in marketing that drives traffic, brings quality leads, and increases sales are free, and retargeting is not an exception.
But retargeting is effective and dirt cheap. Even in competitive industries display ad costs around 10$ for 1000 views.
Also, it gives a second chance to remind warm audiences to convince them of your offer.
Higher Conversion Rate
If you identify and target visitors who visited your landing page or a specific page, you’re more likely to convert those casual visitors into leads.
A retargeting ad gives a soft reminder to accomplish what they started on your site. Also, it reinforces your brand and message in the user’s eyes every time they see yours.
The more they see your ads, the more they know to trust you, and when the right moment comes, they’re more likely to do business with you.
Expect Higher ROI
A healthy conversion rate will naturally lead to higher ROI and lower cost per sale. The more your brand is exposed to your potential customers, the more likely they are to buy from.
How to Set up a Facebook Retargeting Campaign for Cart Abandoners
Facebook retargeting ads are cheaper than other advertising platforms.
But, what’s unique about it is targeting.
You have a wide variety of targeting options like behavior, interests, age, location, and demographics.
You can dig deeper as much as you can until you reach the exact audience.
Step 1: Create a Facebook Pixel
The first step is to install the Facebook pixel on your web pages.
If you don’t have a Facebook advertising account yet, follow these steps.
I assume you already have one.
So, I’m going to skip this step for now.
Click on Ads Manager menu.
Then select the Pixels tab.
When this page comes up, click on the green button create a pixel.
![]()
On this page, name your pixel and click next.
![]()
Once you’ve given the pixel a name, now it’s time to choose how you’re going to install it.
Facebook gives a group of actions or events to choose from such as purchase, generate leads, complete registration, add to cart, etc…
Select the event code you want to track. Click on the code box and copy it. Then place that code on the proper pages of your website.
For E-commerce websites, you have the option to use an integration or tag manager to install the pixel.
Facebook integrates with E-commerce platforms such as Bigcommerce, Google Tag Manager, Magneto, Segment, Shopify, Wix, and Woocommerce.
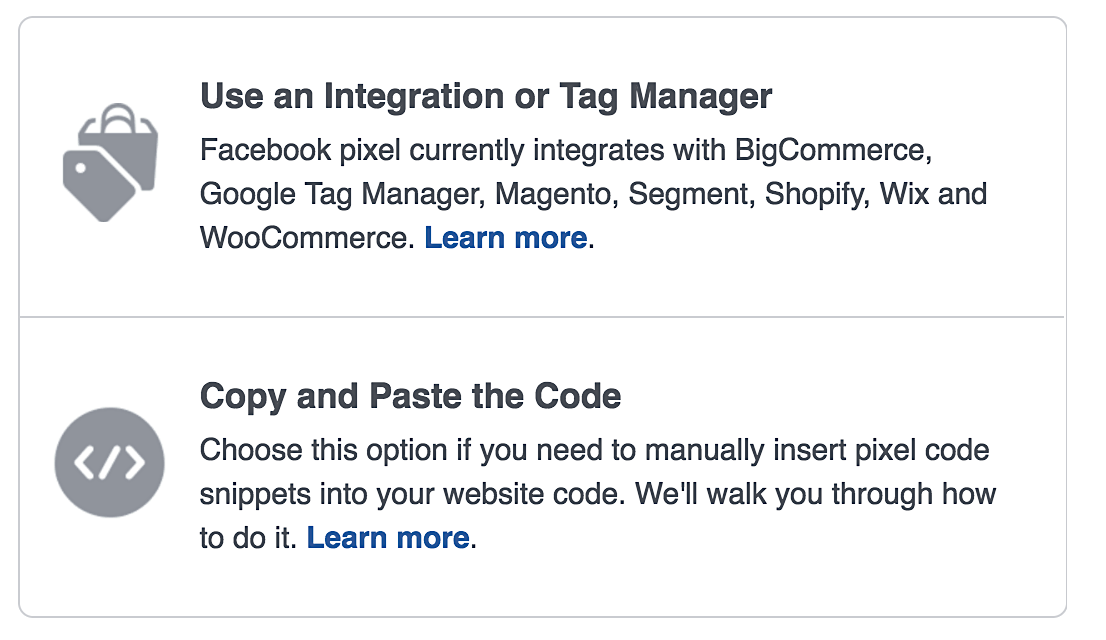
If you’re using any of these, you can select the right platform, and Facebook will give you a step by step instructions.
Otherwise, you click on Copy and Paste the Code.
Step 2: How and Where to Install the Pixel Code on Your Website
While adding the pixel code for yourself may seem a technical task, Facebook still makes it super easy on any sites.
You have the option to send the installing instructions to your website developer. If this sounds good, simply click on the Email Instructions at the bottom right.
![]()
If you want to do it yourself, simply copy the given code, save on a clipboard, and click on the Next button.
![]()
Now it’s time to install the copied pixel code and into the header code of your website.
Paste the pixel code just after the <head> tag but before the </head> tag.
It will look like this
![]()
Now, this code is embedded in each page of your website.
Step 3: Verify the Proper Functioning of the Pixels
Facebook has a tool that troubleshoots page by page to find out any pixel installed on your site.
Using the Facebook Helper Tool can help you
- Verify proper pixel functioning
- Find out common errors
- It gives you tips on how to improve performance.
Step1: Download and install the Facebook Helper Tool extension from the Chrome store to your browser.
Step2: Once you have completed this step, you will notice a new box added in your chrome toolbar like this </>.
Step 3: Now, go to your website. If the gray color turns blue, it means the extension finds a pixel and small badge will indicate the number of pixels found on the site.
Step 4: click on the extension icon. A dialogue box will appear telling you information like load time, pixel code, ID, location and time request.

If the dialogue box shows no errors, it means the pixel is installed correctly.
Step 4: Select Your Target Audience
I assume you have successfully installed the pixel and it’s working properly.
The next step is to choose the audience you want to target.
- Go to Facebook Ads Manager on the upper-left
- Select the Audiences to tab from the menu.
- Now Click on Custom Audience.

Facebook gives a list of custom audience types to choose from.
Click on Website Traffic
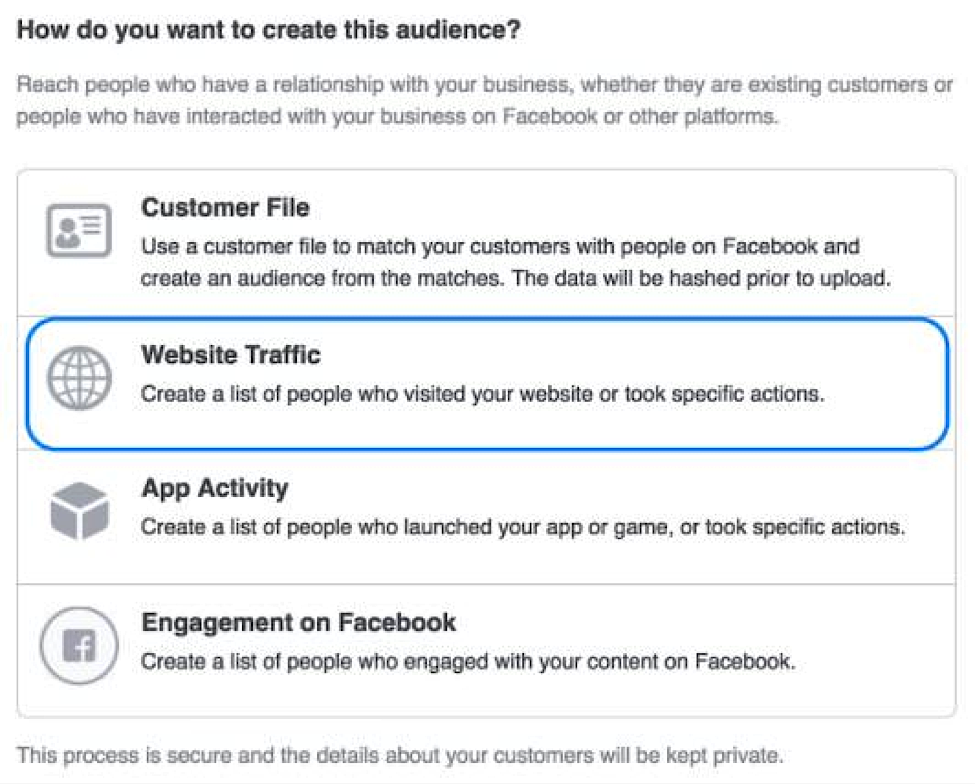
You have a set of parameters to choose from. Now you’re able to target audience based on criteria beyond general traffic such as:
- People who visited specific pages
- Time spent on your website.
- Time frame.
Click on all website traffic and select People who visited specific pages.
You have the option to include or exclude any URLs for targeting purposes.
Note: The audience you’re targeting depends on your campaign goals. You may have a different goal for your business, but in this guide, my target audience is people who abandoned carts.
In the include section, select Add to Cart.
In the exclude section, click Purchase.

Now that you’ve set up the parameters necessary for your targeting, it’s time to give a name to that group of people.
Step5: Create Your Retargeting Ads
Once you’ve selected the audience you want to reach, it’s time to create targeted ads to these people.
If you’re ready for this step, go to the dashboard of your advertising account.
In the upper right corner, there is a green box that says Create Ad and clicks on it.

Now you will be taken to a page where you have to choose your objective for your campaign.

Traffic and Conversion are the most common options, and both have their purposes.
Since your objective is to target people who completed a desired action such as purchase, I’m going to choose Conversion.

Give this campaign a name then click on continue.
You need to select what type of conversion you want to track and verify your pixel.
![]()
Since your objective is to generate a sale, then copy the following code:
fbq(‘track’, ‘Purchase’, {value: 0.00, currency: ‘USD’});
If this step sounds confusing to you, simply click on learn more so Facebook can provide you some guidance.
Now on the Custom Audiences bar select the group of people on selected on step 2
You can filter your custom audience based on additional factors such as:
- Location
- Age
- Gender
- Languages.
- Interests

Then click on Save This Audience.
Step 6: Set up your budget
You don’t need to spend a big amount of money to make Facebook retargeting works for you.
Businesses are not created equal, their scales differ as well as their advertising budget.
If setting up your daily spend sound tricky a little bit, you can start small and scale up your budget later on the most profitable campaign.
Set up your daily spend and hit Continue.

Step 7: Create Your Ad
This process is similar to creating a normal Facebook Ads
Now you should spend a good time crafting a compelling ad to your custom audience. The most important aspects of your ad are the headline, image, and call to action.
Facebook users receive news feed regularly and drive more clicks, so make your ad appears like one. Also, try to run different variations of the same ad with different headlines and images. Then select the ones that fit your target audience.
Conclusion
Facebook retargeting is an effective way to keep your brand fresh in the mind of your customers. Also, targeting the right audience can dramatically boost sales and increase ROI.
Now we are done with theory, it’s time to take action and implement what you’ve just learned.
The post How to Banish Cart Abandonment with Facebook Retargeting appeared first on Tweak Your Biz.
source https://tweakyourbiz.com/marketing/social-media-marketing/facebook-retargeting


No comments:
Post a Comment